harbor
harbor  离线安装方案:

https://github.com/goharbor/harbor
https://goharbor.io/docs/2.0.0/install-config/

Harbor Components
The table below lists the some of the key components that are deployed when you deploy Harbor.

Component	Version
Postgresql	9.6.10-1.ph2
Redis	4.0.10-1.ph2
Clair	2.0.8
Beego	1.9.0
Chartmuseum	0.9.0
Docker/distribution	2.7.1
Docker/notary	0.6.1
Helm	2.9.1
Swagger-ui	3.22.1

------------------
[root@b2 harbor]# docker ps
CONTAINER ID        IMAGE                                   COMMAND                  CREATED             STATUS                 PORTS                                                                 NAMES
6be9279b9300        goharbor/harbor-jobservice:v1.10.4      "/harbor/harbor_jobs…"   10 days ago         Up 10 days (healthy)                                                                         harbor-jobservice
17bbcf66f8d7        goharbor/nginx-photon:v1.10.4           "nginx -g 'daemon of…"   10 days ago         Up 10 days (healthy)   080/tcp, 0.0.0.0: 3/tcp   nginx
9f2b4a026ef9        goharbor/notary-server-photon:v1.10.4   "/bin/sh -c 'migrate…"   10 days ago         Up 10 days                                                                                   notary-server
06fa50d87e8d        goharbor/clair-adapter-photon:v1.10.4   "/clair-adapter/clai…"   10 days ago         Up 10 days (healthy)   8080/tcp                                                              clair-adapter
b7912251c943        goharbor/harbor-core:v1.10.4            "/harbor/harbor_core"    10 days ago         Up 10 days (healthy)                                                                         harbor-core
2a99fae81693        goharbor/notary-signer-photon:v1.10.4   "/bin/sh -c 'migrate…"   10 days ago         Up 10 days                                                                                   notary-signer
805dd3d8c626        goharbor/clair-photon:v1.10.4           "./docker-entrypoint…"   10 days ago         Up 10 days (healthy)   6060-6061/tcp                                                         clair
5fcedee42566        goharbor/chartmuseum-photon:v1.10.4     "./docker-entrypoint…"   10 days ago         Up 10 days (healthy)   9999/tcp                                                              chartmuseum
1b94f65a2ad1        goharbor/redis-photon:v1.10.4           "redis-server /etc/r…"   10 days ago         Up 10 days (healthy)   6379/tcp                                                              redis
2736fa9a8c79        goharbor/registry-photon:v1.10.4        "/home/harbor/entryp…"   10 days ago         Up 10 days (healthy)   5000/tcp                                                              registry
d0365c1ada86        goharbor/harbor-registryctl:v1.10.4     "/home/harbor/start.…"   10 days ago         Up 10 days (healthy)                                                                         registryctl
37351318084d        goharbor/harbor-portal:v1.10.4          "nginx -g 'daemon of…"   10 days ago         Up 10 days (healthy)   8080/tcp                                                              harbor-portal
3cd06e0495cb        goharbor/harbor-db:v1.10.4              "/docker-entrypoint.…"   10 days ago         Up 10 days (healthy)   5432/tcp                                                              harbor-db
1c3b73695ad4        goharbor/harbor-log:v1.10.4             "/bin/sh -c /usr/loc…"   10 days ago         Up 10 days (healthy)   127.0.0.1:1514->10514/tcp                                             harbor-log
[root@b2 harbor]#
----------------------------

System requirements:

On a Linux host: docker 17.06.0-ce+ and docker-compose 1.18.0+ .

Download binaries of Harbor release and follow Installation & Configuration Guide to install Harbor.

If you want to deploy Harbor on Kubernetes, please use the Harbor chart.

Refer to the documentation for more details on how to use Harbor.


shell:here

-----------------------------
openssl req  -newkey rsa:4096 -nodes -sha256 -keyout ca.key -x509 -days 3650 -out ca.crt

openssl req  -newkey rsa:4096 -nodes -sha256 -keyout        .87.180.key -out     .87.180.csr

echo subjectAltName = IP:    .87.180,IP:    .104.5 > extfile.cnf
openssl x509 -req -days 3650 -in     .87.180.csr -CA ca.crt -CAkey ca.key -CAcreateserial -extfile extfile.cnf -out     .87.180.crt

mkdir /etc/docker/certs.d/    .87.180

     复制     .87.180.cert      .87.180.crt      .87.180.key  ca.crt

systemctl restart docker

./prepare  --with-clair

 ./install.sh

----------------------------


    .87.180


1、创建CA证书
openssl req  -newkey rsa:4096 -nodes -sha256 -keyout ca.key -x509 -days 3650 -out ca.crt

CN: 输入 外网地址     .248.195
2、生成证书签名请求
openssl req  -newkey rsa:4096 -nodes -sha256 -keyout     .248.195.key -out     .248.195.csr

openssl req  -newkey rsa:4096 -nodes -sha256 -keyout   196.84.9.key -out   196.84.9.csr

  196.84.9
一路回车出现Common Name 输入IP或域名
Common Name (eg, your name or your server s hostname) []    .248.195


3、生成证书

备注:若需要添加多个地址(允许链接的ip等)

echo subjectAltName = IP:    .254.202,IP:    .248.195 > extfile.cnf
openssl x509 -req -days 3650 -in     .248.195.csr -CA ca.crt -CAkey ca.key -CAcreateserial -extfile extfile.cnf -out     .248.195.crt


echo subjectAltName = IP:  196.84.9 > extfile.cnf
openssl x509 -req -days 3650 -in   196.84.9.csr -CA ca.crt -CAkey ca.key -CAcreateserial -extfile extfile.cnf -out   196.84.9.crt


 4、配置harbor.cfg

#set hostname
hostname = xxxx     #域名或ip
#set ui_url_protocol
uiurlprotocol = https    #这里改为https****
......
#The path of cert and key files for nginx, they are applied only the protocol is set to https
ssl_cert = /harborcert/    .248.195.crt     #crt位置
ssl_cert_key = /harborcert/    .248.195.key  #key的位置

新版本是配置
harbor.yml
# Configuration file of Harbor

# The IP address or hostname to access admin UI and registry service.
# DO NOT use localhost or 127.0.0.1, because Harbor needs to be accessed by external clients.
hostname:     .248.195

# http related config
http:
  # port for http, default is 80. If https enabled, this port will redirect to https port
  port: 80

# https related config
https:
  # https port for harbor, default is 443
  port: 443
  # The path of cert and key files for nginx
  certificate: /harborcert/    .248.195.crt
  private_key: /harborcert/    .248.195.key

# 重新生成配置文件
./prepare --with-notary --with-clair --with-chartmuseum

# 启动
docker-compose up -d

6、测试

1、访问,https://配置的ip或域名(若nginx的443配置了其他端口需要加上对应端口号)
2、# docker login xxxx

若报错x509: certificate signed by unknown authority:

需要把之前制作的ca证书添加到信任(因为是自签名证书):


# mkdir –p /etc/docker/certs.d/    .248.195
# cp ca.crt /etc/docker/certs.d/    .248.195/ca.crt
# systemc   restart docker.service


# mkdir  -p /etc/docker/certs.d/  196.84.9
# cp ca.crt /etc/docker/certs.d/    .248.195/ca.crt
# systemc   restart docker.service


注意:
每一个客户端都需要复制上面的ca.crt到Docker相应目录,然后重启Docker。


./prepare  --with-clair

 ./install.sh


docker login https://    .248.195


./install.sh

会解压并生成docker image

docker login https://192.168. 104

docker tag nginx 192.168.31.104/library/nginx
docker push 192.168.31.104/library/nginx
harbor高可用集群配置
目录 https://www.cnblogs.com/breezey/p/9444231.html
- 说明
- 双主复制
- 主从同步
- 双主复制说明
- 多harbor实例共享后端存储
- 方案说明
- 环境说明
- 配置说明
- 安装nfs
- 安装redis和mysql
- 导入registry数据库
- 配置harbor
- 挂载nfs目录
- 修改harbor.cfg配置
- 修改docker-compose.yml配置
- 双主复制
说明
在上一篇企业级镜像管理系统Harbor中,我们简要说明了单机版本harbor的配置。然而这种单机部署显然无法满足在生产中需求,必须要保证应用的高可用性。
目前有两种主流的方案来解决这个问题:
- 双主复制
- 多harbor实例共享后端存储
双主复制
主从同步
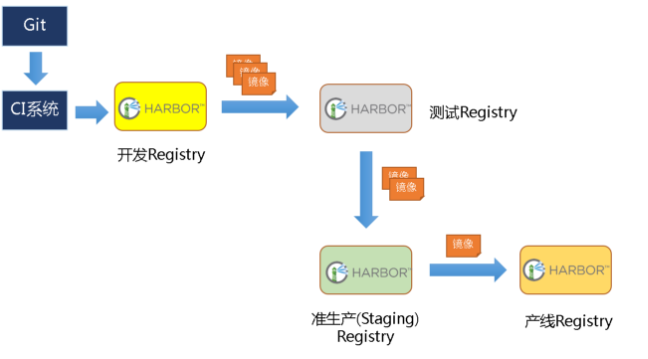
harbor官方默认提供主从复制的方案来解决镜像同步问题,通过复制的方式,我们可以实时将测试环境harbor仓库的镜像同步到生产环境harbor,类似于如下流程:
在实际生产运维的中,往往需要把镜像发布到几十或上百台集群节点上。这时,单个Registry已经无法满足大量节点的下载需求,因此要配置多个Registry实例做负载均衡。手工维护多个Registry实例上的镜像,将是十分繁琐的事情。Harbor可以支持一主多从的镜像发布模式,可以解决大规模镜像发布的难题:
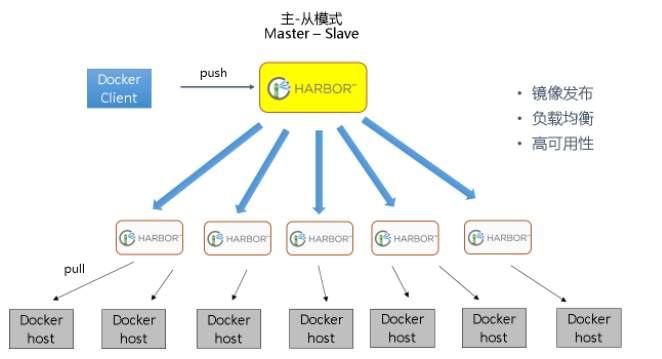
只要往一台Registry上发布,镜像就像“仙女散花”般地同步到多个Registry中,高效可靠。
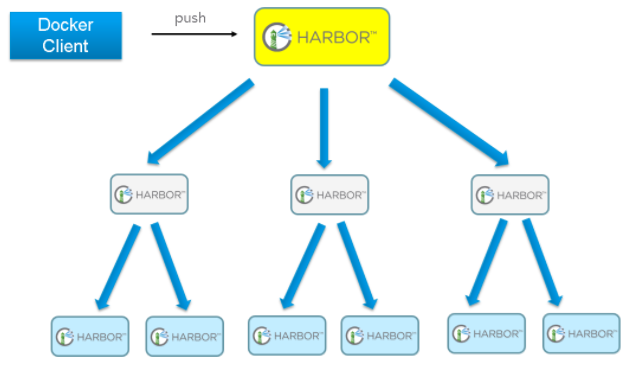
如果是地域分布较广的集群,还可以采用层次型发布方式,如从集团总部同步到省公司,从省公司再同步到市公司:
然而单靠主从同步,仍然解决不了harbor主节点的单点问题。
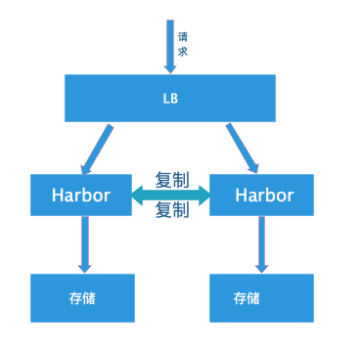
双主复制说明
所谓的双主复制其实就是复用主从同步实现两个harbor节点之间的双向同步,来保证数据的一致性,然后在两台harbor前端顶一个负载均衡器将进来的请求分流到不同的实例中去,只要有一个实例中有了新的镜像,就是自动的同步复制到另外的的实例中去,这样实现了负载均衡,也避免了单点故障,在一定程度上实现了Harbor的高可用性:
这个方案有一个问题就是有可能两个Harbor实例中的数据不一致。假设如果一个实例A挂掉了,这个时候有新的镜像进来,那么新的镜像就会在另外一个实例B中,后面即使恢复了挂掉的A实例,Harbor实例B也不会自动去同步镜像,这样只能手动的先关掉Harbor实例B的复制策略,然后再开启复制策略,才能让实例B数据同步,让两个实例的数据一致。
另外,我还需要多吐槽一句,在实际生产使用中,主从复制十分的不靠谱。
所以这里推荐使用下面要说的这种方案。
多harbor实例共享后端存储
方案说明
共享后端存储算是一种比较标准的方案,就是多个Harbor实例共享同一个后端存储,任何一个实例持久化到存储的镜像,都可被其他实例中读取。通过前置LB进来的请求,可以分流到不同的实例中去处理,这样就实现了负载均衡,也避免了单点故障:
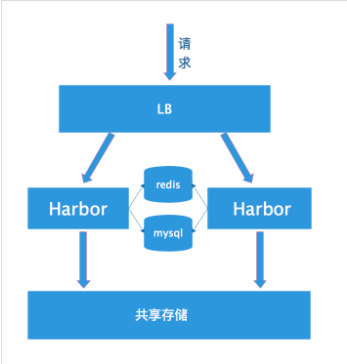
这个方案在实际生产环境中部署需要考虑三个问题:
- 共享存储的选取,Harbor的后端存储目前支持AWS S3、Openstack Swift, Ceph等,在我们的实验环境里,就直接使用nfs
- Session在不同的实例上共享,这个现在其实已经不是问题了,在最新的harbor中,默认session会存放在redis中,我们只需要将redis独立出来即可。可以通过redis sentinel或者redis cluster等方式来保证redis的可用性。在我们的实验环境里,仍然使用单台redis
- Harbor多实例数据库问题,这个也只需要将harbor中的数据库拆出来独立部署即可。让多实例共用一个外部数据库,数据库的高可用也可以通过数据库的高可用方案保证。
环境说明
实验环境:
| ip | role |
|---|---|
| 192.168.198.133 | harbor |
| 192.168.198.135 | harbor |
| 192.168.198.136 | redis、mysql、nfs |
需要强调的是,我们的环境中,不包括负载均衡器的配置,请自行查阅负载均衡配置相关文档
配置说明
安装nfs
# 安装nfs
apt install nfs-kernel-server nfs-common

# 编辑/etc/exports文件
/data	*(rw,no_root_squash)

chmod 777 -R /data

systemctl start nfs-server
安装redis和mysql
这里我们就直接通过docker安装,docker-compose.yml文件内容如下:
version: '3'
services:
  mysql-server:
    hostname: mysql-server
    container_name: mysql-server
    image: mysql:5.7
    network_mode: host
    volumes:
      - /mysql57/data:/var/lib/mysql
    command: --character-set-server=utf8
    environment:
      MYSQL_ROOT_PASSWORD: 123456
  redis:
    hostname: redis-server
    container_name: redis-server
    image: redis:3
    network_mode: host
启动:
docker-compose up -d
导入registry数据库
配置好了mysql以后,还需要往mysql数据库中导入harbor registry库。在《企业级镜像管理系统》中,我们安装了一个单机版harbor,启动了一个mysql,里面有一个registry数据库,直接导出来,然后再导入到新数据库中:
# 导出数据库:

docker exec -it harbor_db /bin/bash
mysqldump -uroot -p --databases registry > registry.dump

# 在宿主机上将registry.dump复制出来
docker cp  harbor_db:/registry.dump ./

# 将宿主机上的registry.dump复制到独立的mysql容器中

docker cp ./registry.dump <mysql-server-container>:/registry.dump

# 在独立的mysql容器将将registry数据库导入

docker exec -it <mysql-server-container> /bin/bash

mysql -uroot -p

mysql> source /registry.dump
配置harbor
挂载nfs目录
在harbor节点上挂载nfs目录:
mount -t nfs 192.168.198.136:/data /data
修改harbor.cfg配置
在harbor节点上,下载好harbor的安装包,生成好自签名证书,修改prepare文件,可直接参考《企业级镜像管理系统Harbor》,不同的是,harbor.cfg文件需要修改数据库及redis配置如下:
db_host = 192.168.198.136
db_password = 123456
db_port = 3306
db_user = root
redis_url = 192.168.198.136:6379
修改docker-compose.yml配置
与单机版harbor相比,集群配置不再需要启动mysql和redis,所以docker-compose.yml也需要作相应修改。事实上,在harbor的安装目录中,有个ha的目录,里面已经提供了我们需要的docker-compose.yml文件,只需要复制出来即可。实际上,在这个目录中,还提供了使用lvs作为负载均衡器时,keepalived的配置。
cp ha/docker-compose.yml
./prepare
./install.sh
在两个harbor节点上完成安装以后,我们可以通过绑定hosts到不同的节点来验证两个节点的负载均衡效果。
Stolon inside kubernetes
In this example you’ll see how stolon can provide an high available postgreSQL cluster inside kubernetes.
The sentinels and proxies will be deployed as kubernetes deployments while the keepers as a kubernetes statefulset.
Docker image
Prebuilt images are available on the dockerhub, the images’ tags are the stolon release version plus the postgresql version (for example v0.12.0-pg10).
NOTE: These images are example images provided for quickly testing stolon. In production you should build your own image customized to fit your needs (adding postgres extensions, backup tools/scripts etc…).
Additional images are available:
master-pg10: automatically built after every commit to the master branch.
In the image directory you’ll find a Dockerfile to build the image used in this example (starting from the official postgreSQL images).
To build the image used in this example just execute (from the project root) make with the docker target providing the mandatory PGVERSION and TAG variables.
For example, if you want to build an image named stolon:master-pg10 that uses postgresql 10 you should execute:
make PGVERSION=10 TAG=stolon:master-pg10 docker
Once the image is built you should push it to the docker registry used by your kubernetes infrastructure.
The provided example uses sorintlab/stolon:master-pg10
Cluster setup and tests
This example has some predefined values that you’d like to change:
- The cluster name is
kube-stolon. It’s set in the variousstolon-clusterlabels and in the component--cluster-nameoption. The labels and the--cluster-nameoption must be in sync. - It uses the kubernetes backend. You can also choose other backends (like etcdv3) setting the
ST${COMPONENT}_STORE_*environment variables (see the commands invocation documentation).
If your k8s cluster has RBAC enabled you should create a role and a rolebinding to a service account. As an example take a look at the provided role and role-binding example definitions that define a stolon role bound to the default service account in the default namespace.
Initialize the cluster
All the stolon components wait for an existing clusterdata entry in the store. So the first time you have to initialize a new cluster. For more details see the cluster initialization doc. You can do this step at every moment, now or after having started the stolon components.
You can execute stolonctl in different ways:
- as a one shot command executed inside a temporary pod:
kubectl run -i -t stolonctl --image=sorintlab/stolon:master-pg10 --restart=Never --rm -- /usr/local/bin/stolonctl --cluster-name=kube-stolon --store-backend=kubernetes --kube-resource-kind=configmap init
- from a machine that can access the store backend:
stolonctl --cluster-name=kube-stolon --store-backend=kubernetes --kube-resource-kind=configmap init
- later from one of the pods running the stolon components.
Create the sentinel(s)
kubectl create -f stolon-sentinel.yaml
This will create a deployment that defines 2 replicas for the stolon sentinel. You can change the number of replicas in the deployment definition (or scale it with kubectl scale).
Create the keeper’s password secret
This creates a password secret that can be used by the keeper to set up the initial database superuser. This example uses the value ‘password1’ but you will want to replace the value with a Base64-encoded password of your choice.
kubectl create -f secret.yaml
Create the stolon keepers statefulset
The example definition uses a dynamic provisioning with a storage class of type “anything” that works also with minikube and will provision volume using the hostPath provider, but this shouldn’t be used in production and won’t work in multi-node cluster. In production you should use your own defined storage-class and configure your persistent volumes (statically or dynamic using a provisioner, see the related k8s documentation).
kubectl create -f stolon-keeper.yaml
This will define a statefulset that will create 2 stolon-keepers. The sentinel will choose a random keeper as the initial master, this keeper will initialize a new db cluster and the other keeper will become a standby.
Create the proxies
kubectl create -f stolon-proxy.yaml
This will create a deployment that defines 2 replicas for the stolon proxy. You can change the number of replicas in the deployment definition (or scale it with kubectl scale).
Create the proxy service
The proxy service is used as an entry point with a fixed ip and dns name for accessing the proxies.
kubectl create -f stolon-proxy-service.yaml
Connect to the db
Connect to the proxy service
The password for the stolon user will be the value specified in your secret.yaml above (or password1 if you did not change it).
psql --host stolon-proxy-service  --port 5432 postgres -U stolon -W
Password for user stolon:
psql (9.4.5, server 9.4.4)
Type "help" for help.

postgres=#
Create a test table and insert a row
postgres=# create table test (id int primary key not null, value text not null);
CREATE TABLE
postgres=# insert into test values (1, 'value1');
INSERT 0 1
postgres=# select * from test;
 id | value
----+--------
  1 | value1
(1 row)
you’ll have a state like this:
kubectl get pods
NAME                               READY     STATUS    RESTARTS   AGE
stolon-keeper-0                    1/1       Running   0          5m
stolon-keeper-1                    1/1       Running   0          5m
stolon-proxy-fd7c9b4bd-89c9z       1/1       Running   0          5m
stolon-proxy-fd7c9b4bd-pmj86       1/1       Running   0          5m
stolon-sentinel-5c76865bd5-bc9n2   1/1       Running   0          5m
stolon-sentinel-5c76865bd5-fmqts   1/1       Running   0          5m
Simulate master death
There are different ways to tests this. In a multi node setup you can just shutdown the host executing the master keeper pod.
In a single node setup we can kill the current master keeper pod but usually the statefulset controller will recreate a new pod before the sentinel declares it as failed. To avoid the restart we’ll first remove the statefulset without removing the pod and then kill the master keeper pod. The persistent volume will be kept so we’ll be able to recreate the statefulset and the missing pods will be recreated with the previous data.
kubectl delete statefulset stolon-keeper --cascade=false
kubectl delete pod stolon-keeper-0
You can take a look at the leader sentinel log and will see that after some seconds it’ll declare the master keeper as not healthy and elect the other one as the new master:
no keeper info available db=cb96f42d keeper=keeper0
no keeper info available db=cb96f42d keeper=keeper0
master db is failed db=cb96f42d keeper=keeper0
trying to find a standby to replace failed master
electing db as the new master db=087ce88a keeper=keeper1
Now, inside the previous psql session you can redo the last select. The first time psql will report that the connection was closed and then it successfully reconnected:
postgres=# select * from test;
server closed the connection unexpectedly
        This probably means the server terminated abnormally
        before or while processing the request.
The connection to the server was lost. Attempting reset: Succeeded.
postgres=# select * from test;
 id | value
----+--------
  1 | value1
(1 row)
Scale your cluster keepers
You can add additional stolon keepers increasing the replica count in the statefulset. Shrinking the statefulset should be done very carefully or you can end in a situation where the current master pod will be removed and the remaining keepers cannot be elected as master because not in sync.
Scale your cluster sentinels and proxies
You can increase/decrease the number of stolon sentinels and proxies:
kubectl scale --replicas=3 deployment stolon-sentinel
Stolon inside kubernetes
In this example you'll see how stolon can provide an high available postgreSQL cluster inside kubernetes.

The sentinels and proxies will be deployed as kubernetes deployments while the keepers as a kubernetes statefulset.

Docker image
Prebuilt images are available on the dockerhub, the images' tags are the stolon release version plus the postgresql version (for example v0.12.0-pg10).

NOTE: These images are example images provided for quickly testing stolon. In production you should build your own image customized to fit your needs (adding postgres extensions, backup tools/scripts etc...).

Additional images are available:

master-pg10: automatically built after every commit to the master branch.
In the image directory you'll find a Dockerfile to build the image used in this example (starting from the official postgreSQL images).

To build the image used in this example just execute (from the project root) make with the docker target providing the mandatory PGVERSION and TAG variables.

For example, if you want to build an image named stolon:master-pg10 that uses postgresql 10 you should execute:

make PGVERSION=10 TAG=stolon:master-pg10 docker
Once the image is built you should push it to the docker registry used by your kubernetes infrastructure.

The provided example uses sorintlab/stolon:master-pg10

Cluster setup and tests
This example has some predefined values that you'd like to change:

The cluster name is kube-stolon. It's set in the various stolon-cluster labels and in the component --cluster-name option. The labels and the --cluster-name option must be in sync.
It uses the kubernetes backend. You can also choose other backends (like etcdv3) setting the ST${COMPONENT}_STORE_* environment variables (see the commands invocation documentation).
If your k8s cluster has RBAC enabled you should create a role and a rolebinding to a service account. As an example take a look at the provided role and role-binding example definitions that define a stolon role bound to the default service account in the default namespace.

Initialize the cluster
All the stolon components wait for an existing clusterdata entry in the store. So the first time you have to initialize a new cluster. For more details see the cluster initialization doc. You can do this step at every moment, now or after having started the stolon components.

You can execute stolonctl in different ways:

as a one shot command executed inside a temporary pod:
kubectl run -i -t stolonctl --image=sorintlab/stolon:master-pg10 --restart=Never --rm -- /usr/local/bin/stolonctl --cluster-name=kube-stolon --store-backend=kubernetes --kube-resource-kind=configmap init
from a machine that can access the store backend:
stolonctl --cluster-name=kube-stolon --store-backend=kubernetes --kube-resource-kind=configmap init
later from one of the pods running the stolon components.
Create the sentinel(s)
kubectl create -f stolon-sentinel.yaml
This will create a deployment that defines 2 replicas for the stolon sentinel. You can change the number of replicas in the deployment definition (or scale it with kubectl scale).

Create the keeper's password secret
This creates a password secret that can be used by the keeper to set up the initial database superuser. This example uses the value 'password1' but you will want to replace the value with a Base64-encoded password of your choice.

kubectl create -f secret.yaml
Create the stolon keepers statefulset
The example definition uses a dynamic provisioning with a storage class of type "anything" that works also with minikube and will provision volume using the hostPath provider, but this shouldn't be used in production and won't work in multi-node cluster. In production you should use your own defined storage-class and configure your persistent volumes (statically or dynamic using a provisioner, see the related k8s documentation).

kubectl create -f stolon-keeper.yaml
This will define a statefulset that will create 2 stolon-keepers. The sentinel will choose a random keeper as the initial master, this keeper will initialize a new db cluster and the other keeper will become a standby.

Create the proxies
kubectl create -f stolon-proxy.yaml
This will create a deployment that defines 2 replicas for the stolon proxy. You can change the number of replicas in the deployment definition (or scale it with kubectl scale).

Create the proxy service
The proxy service is used as an entry point with a fixed ip and dns name for accessing the proxies.

kubectl create -f stolon-proxy-service.yaml
Connect to the db
Connect to the proxy service
The password for the stolon user will be the value specified in your secret.yaml above (or password1 if you did not change it).

psql --host stolon-proxy-service  --port 5432 postgres -U stolon -W
Password for user stolon:
psql (9.4.5, server 9.4.4)
Type "help" for help.

postgres=#
Create a test table and insert a row
postgres=# create table test (id int primary key not null, value text not null);
CREATE TABLE
postgres=# insert into test values (1, 'value1');
INSERT 0 1
postgres=# select * from test;
 id | value
----+--------
  1 | value1
(1 row)
you'll have a state like this:

kubectl get pods
NAME                               READY     STATUS    RESTARTS   AGE
stolon-keeper-0                    1/1       Running   0          5m
stolon-keeper-1                    1/1       Running   0          5m
stolon-proxy-fd7c9b4bd-89c9z       1/1       Running   0          5m
stolon-proxy-fd7c9b4bd-pmj86       1/1       Running   0          5m
stolon-sentinel-5c76865bd5-bc9n2   1/1       Running   0          5m
stolon-sentinel-5c76865bd5-fmqts   1/1       Running   0          5m
Simulate master death
There are different ways to tests this. In a multi node setup you can just shutdown the host executing the master keeper pod.

In a single node setup we can kill the current master keeper pod but usually the statefulset controller will recreate a new pod before the sentinel declares it as failed. To avoid the restart we'll first remove the statefulset without removing the pod and then kill the master keeper pod. The persistent volume will be kept so we'll be able to recreate the statefulset and the missing pods will be recreated with the previous data.

kubectl delete statefulset stolon-keeper --cascade=false
kubectl delete pod stolon-keeper-0
You can take a look at the leader sentinel log and will see that after some seconds it'll declare the master keeper as not healthy and elect the other one as the new master:

no keeper info available db=cb96f42d keeper=keeper0
no keeper info available db=cb96f42d keeper=keeper0
master db is failed db=cb96f42d keeper=keeper0
trying to find a standby to replace failed master
electing db as the new master db=087ce88a keeper=keeper1
Now, inside the previous psql session you can redo the last select. The first time psql will report that the connection was closed and then it successfully reconnected:

postgres=# select * from test;
server closed the connection unexpectedly
        This probably means the server terminated abnormally
        before or while processing the request.
The connection to the server was lost. Attempting reset: Succeeded.
postgres=# select * from test;
 id | value
----+--------
  1 | value1
(1 row)
Scale your cluster keepers
You can add additional stolon keepers increasing the replica count in the statefulset. Shrinking the statefulset should be done very carefully or you can end in a situation where the current master pod will be removed and the remaining keepers cannot be elected as master because not in sync.

Scale your cluster sentinels and proxies
You can increase/decrease the number of stolon sentinels and proxies:

kubectl scale --replicas=3 deployment stolon-sentinel
kubectl scale --replicas=3 deployment stolon-proxykubectl scale --replicas=3 deployment stolon-proxy