coredns
配置步骤
集群(system)-资源(配置映射)-名称空间kube-system(coredns)
1)进入集群(system)
2)选择资源(配置映射)
3)找到名称空间kube-system下的coredns
4)对coredns进行编辑-添加host

.:53 {
    errors
    health
    ready
    kubernetes cluster.local in-addr.arpa ip6.arpa {
      pods insecure
      fallthrough in-addr.arpa ip6.arpa
    }
    prometheus :9153
    hosts {
        10.211.55.24 gitlab.zbq.com
        10.211.55.19 harbor.zbq.com
        fallthrough
    }
    forward . "/etc/resolv.conf"
    cache 30
    loop
    reload
    loadbalance
}
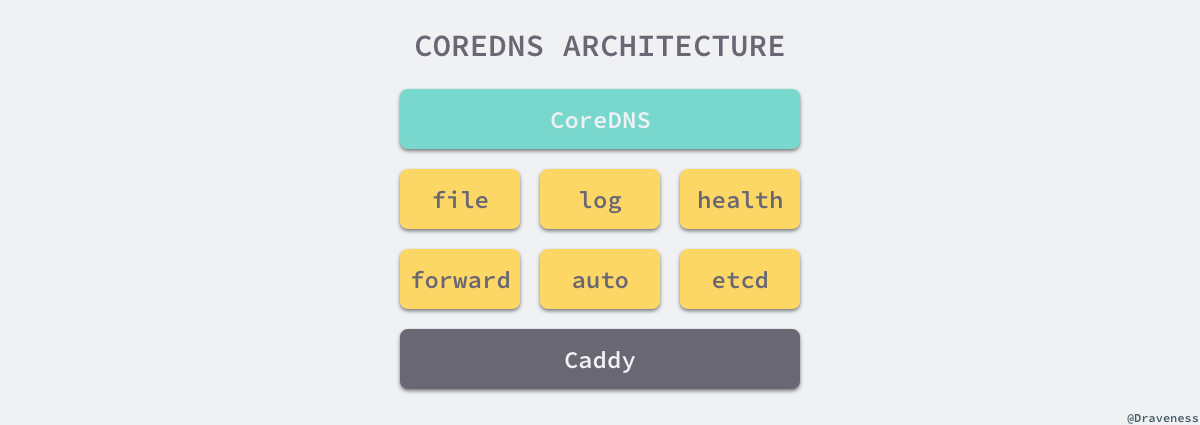
CoreDNS 的架构
解析流程

这里用到的是 CoreDNS 的 hosts plugin 插件。该插件仅支持 A, AAAA, 和 PTR 记录。
在线修改 coredns 的 configmap,不用重启哦。
kubectl edit configmap coredns -n kube-system
apiVersion: v1
data:
  Corefile: |
    .:53 {
        errors
        health
        ready
        kubernetes cluster.local in-addr.arpa ip6.arpa {
          pods insecure
          fallthrough in-addr.arpa ip6.arpa
        }
        hosts {
            192.168.1.122     demo1.xx.com
            192.168.1.123     demo2.xx.com
            fallthrough
        }
        prometheus :9153
        forward . /etc/resolv.conf {
          prefer_udp
        }
        cache 30
        loop
        reload
        loadbalance
    }
kind: ConfigMap
metadata:
  labels:
    addonmanager.kubernetes.io/mode: EnsureExists
  name: coredns
  namespace: kube-system
还要注意的是 forward plugin 插件。用于设置 upstream Nameservers 上游 DNS 服务器。CoreDNS 就是通过它让容器能够解析外网的。
这里设置的是宿主机的 /etc/resolv.conf 文件中的 nameservers。
另外,在 kuberntets 中,pod 的默认 dnsPolicy 不是 Default,而是 ClusterFirst。
Note: “Default” is not the default DNS policy.
If dnsPolicy is not explicitly specified, then “ClusterFirst” is used.
“ClusterFirst”: Any DNS query that does not match the configured cluster domain suffix,
such as “www.kubernetes.io”, is forwarded to the upstream nameserver inherited from the node.
参考:
- kubernetes plugin
- DNS for Services and Pods
- How Queries Are Processed in CoreDNS
- Corefile Explained
- Deploying Kubernetes with CoreDNS using kubeadm
- Custom DNS Entries For Kubernetes
- Kubernetes DNS-Based Service Discovery
- 详解 DNS 与 CoreDNS 的实现原理
- CoreDNS 使用与架构分析
- 自定义DNS服务
- 调试DNS问题
- 集群内置DNS配置说明
- 使用 Autopath 插件
- autopath plugin
终于解决 k8s 集群中部署 nodelocaldns 的问题
自从开始在 kubernetes 集群中部署 nodelocaldns 以提高 dns 解析性能以来,一直被一个问题困扰,只要一部署 nodelocaldns ,在 coredns 中添加的 rewrite 与 hosts 配置(如下)就失效,很是郁闷。
rewrite stop { name regex ([a-zA-Z0-9-]+)_([a-zA-Z0-9-]+)\.$ {1}-{2}.production.svc.cluster.local answer name ([a-zA-Z0-9-]+)-([a-zA-Z0-9-]+)\.production\.svc\.cluster\.local\.$ {1}_{2}}hosts { 10.0.78.124 memcached .... fallthrough}部署使用的是下面的命令,在部署时将 nodelocaldns.yaml 中的几个变量进行如下的替换。
sed 's/k8s.gcr.io/gcr.azk8s.cn\/google_containers/gs/__PILLAR__DNS__SERVER__/10.96.0.10/gs/__PILLAR__LOCAL__DNS__/169.254.20.10/gs/__PILLAR__DNS__DOMAIN__/cluster.local/g' nodelocaldns.yaml |kubectl apply -n kube-system -f -部署后其他解析都正常,就是与 rewrite 与 hosts 配置相关的解析总是失败。
后来尝试直接在 node-local-dns 中配置 rewrite 与 hosts ,结果发现 nodelocaldns 镜像集成的 coredns 版本不支持这 2 个插件(plugin),更是郁闷。
在准备放弃之前,今天再次尝试解决这个问题,终于在 github 上一个 issue 的回复中找到了解决方法,详见 plugin/rewrite Not working in k8s 。
原来问题是 .:53 部分的 forward 配置引起的。
进入 nodelocaldns 容器 cat /etc/Corefile 命令查看 .:53 部分的 forward 配置是 /etc/resolv.conf ,根本没有转发给集群的 coredns ,难怪 rewrite 与 hosts 的配置不起作用。
.:53 { errors cache 30 reload loop bind 169.254.20.10 10.96.0.10 forward . /etc/resolv.conf { force_tcp } prometheus :9253}在 nodelocaldns.yaml 中这里的 forward 配置对应的是一个变量 __PILLAR__UPSTREAM__SERVERS__ 。
forward . __PILLAR__UPSTREAM__SERVERS__ { force_tcp}这个变量值是在部署 node-local-dns 时自动设置的。
The following variables will be set by the node-cache images – k8s.gcr.io/k8s-dns-node-cache:1.15.6 or later. The values will be determined by reading the kube-dns configMap for custom Upstream server configuration.
只要将 __PILLAR__UPSTREAM__SERVERS__ 改为 kube-dns-upstream service 的 IP 地址(比如这里是10.96.53.196)就能解决问题。
查看 kube-dns-upstream service IP 地址的命令:
kubectl get svc -n kube-system | grep kube-dns-upstream
改进后的部署命令:
sed 's/k8s.gcr.io/gcr.azk8s.cn\/google_containers/gs/__PILLAR__DNS__SERVER__/10.96.0.10/gs/__PILLAR__LOCAL__DNS__/169.254.20.10/gs/__PILLAR__UPSTREAM__SERVERS__/10.96.53.196/gs/__PILLAR__DNS__DOMAIN__/cluster.local/g' nodelocaldns.yaml |kubectl apply -n kube-system -f -
之前在解决 CoreDNS 的5秒超时问题的时候,除了通过 dnsConfig 去强制使用 tcp 方式解析之外,我们提到过使用 NodeLocalDNSCache 来解决这个问题。NodeLocalDNSCache 通过在集群节点上运行一个 DaemonSet 来提高 clusterDNS 性能和可靠性。处于 ClusterFirst 的 DNS 模式下的 Pod 可以连接到 kube-dns 的 serviceIP 进行 DNS 查询。通过 kube-proxy 组件添加的 iptables 规则将其转换为 CoreDNS 端点。通过在每个集群节点上运行 DNS 缓存,NodeLocal DNSCache 可以缩短 DNS 查找的延迟时间、使 DNS 查找时间更加一致,以及减少发送到 kube-dns 的 DNS 查询次数。
在集群中运行 NodeLocal DNSCache 有如下几个好处:
如果本地没有 CoreDNS 实例,则具有最高 DNS QPS 的 Pod 可能必须到另一个节点进行解析,使用 NodeLocal DNSCache 后,拥有本地缓存将有助于改善延迟
跳过 iptables DNAT 和连接跟踪将有助于减少 conntrack 竞争并避免 UDP DNS 条目填满 conntrack 表(常见的5s超时问题就是这个原因造成的)
从本地缓存代理到 kube-dns 服务的连接可以升级到 TCP,TCP conntrack 条目将在连接关闭时被删除,而 UDP 条目必须超时(默认 nfconntrackudp_timeout 是 30 秒)
将 DNS 查询从 UDP 升级到 TCP 将减少归因于丢弃的 UDP 数据包和 DNS 超时的尾部等待时间,通常长达 30 秒(3 次重试+ 10 秒超时)
要安装 NodeLocal DNSCache 也非常简单,直接获取官方的资源清单即可:
$ wget https://github.com/kubernetes/kubernetes/raw/master/cluster/addons/dns/nodelocaldns/nodelocaldns.yaml
该资源清单文件中包含几个变量,其中:
PILLAR__DNS__SERVER :表示 kube-dns 这个 Service 的 ClusterIP,可以通过命令 kubectlgetsvc-n kube-system|grep kube-dns|awk'{ print $3 }’ 获取
PILLAR__LOCAL__DNS:表示 DNSCache 本地的 IP,默认为 169.254.20.10
PILLAR__DNS__DOMAIN:表示集群域,默认就是 cluster.local
另外还有两个参数 PILLAR__CLUSTER__DNS 和 PILLAR__UPSTREAM__SERVERS,这两个参数会通过镜像 1.15.6 版本以上的去进行配置,对应的值来源于 kube-dns 的 ConfigMap 和定制的 Upstream Server 配置。直接执行如下所示的命令即可安装:
$ sed ‘s/k8s.gcr.io/cnych/gs/PILLAR__DNS__SERVER/10.96.0.10/gs/PILLAR__LOCAL__DNS/169.254.20.10/gs/PILLAR__DNS__DOMAIN/cluster.local/g’ nodelocaldns.yaml |kubectl apply -f –
可以通过如下命令来查看对应的 Pod 是否已经启动成功:
$ kubectl get pods -n kube-system | grep node-local-dnsnode-local-dns-8zm2f 1/1 Running 0 9m54snode-local-dns-dd4xg 1/1 Running 0 9m54snode-local-dns-hs8qq 1/1 Running 0 9m54snode-local-dns-pxfxn 1/1 Running 0 9m54snode-local-dns-stjm9 1/1 Running 0 9m54snode-local-dns-wjxvz 1/1 Running 0 9m54snode-local-dns-wn5wc 1/1 Running 0 7m49s
需要注意的是这里使用 DaemonSet 部署 node-local-dns 使用了 hostNetwork=true,会占用宿主机的 8080 端口,所以需要保证该端口未被占用。
但是到这里还没有完,如果 kube-proxy 组件使用的是 ipvs 模式的话我们还需要修改 kubelet 的 –cluster-dns 参数,将其指向 169.254.20.10,Daemonset 会在每个节点创建一个网卡来绑这个 IP,Pod 向本节点这个 IP 发 DNS 请求,缓存没有命中的时候才会再代理到上游集群 DNS 进行查询。iptables 模式下 Pod 还是向原来的集群 DNS 请求,节点上有这个 IP 监听,会被本机拦截,再请求集群上游 DNS,所以不需要更改 –cluster-dns 参数。
由于我这里使用的是 kubeadm 安装的 1.16 版本的集群,所以我们只需要替换节点上 /var/lib/kubelet/config.yaml 文件中的 clusterDNS 这个参数值,然后重启即可,我们也可以完全在官方的 DaemonSet 资源对象中添加一个 initContainer 来完成这个工作:
initContainers: # ipvs模式下需要修改dns配置,重启kubelet – name: setup image: alpine tty: true stdin: true securityContext: privileged: true command: – nsenter – –target – “1” – –mount – –uts – –ipc – –net – –pid – — – bash – -c – | # 确保 kubelet –cluster-dns 被设置为 169.254.20.10 echo “Configuring kubelet –cluster-dns=169.254.20.10” sed -i ‘s/10.96.0.10/169.254.20.10/g’ /var/lib/kubelet/config.yaml systemctl daemon-reload && systemctl restart kubelet
但是需要注意的是对于线上环境还是不推荐用上面的方式,因为它会优先将 kubelet 的 cluster-dns 参数进行修改,然后再去安装 NodeLocal,这中间毕竟有一段真空期,我们完全可以手动去一个节点一个节点验证:
$ sed -i ‘s/10.96.0.10/169.254.20.10/g’ /var/lib/kubelet/config.yaml$ systemctl daemon-reload && systemctl restart kubelet
待 node-local-dns 安装配置完成后,我们可以部署一个新的 Pod 来验证下:(test-node-local-dns.yaml)
apiVersion: v1kind: Podmetadata: name: test-node-local-dnsspec: containers: – name: local-dns image: busybox command: [“/bin/sh”, “-c”, “sleep 60m”]
直接部署:
$ kubectl apply -f test-node-local-dns.yaml$ kubectl exec -it test-node-local-dns /bin/sh/ # cat /etc/resolv.confnameserver 169.254.20.10search default.svc.cluster.local svc.cluster.local cluster.localoptions ndots:5
我们可以看到 nameserver 已经变成 169.254.20.10 了,当然对于之前的历史 Pod 要想使用 node-local-dns 则需要重建,当然如果要想去跟踪 DNS 的解析过程的话可以去通过抓包来观察。
前几天我们在解决 CoreDNS 的5秒超时问题的时候,使用了 NodeLocal DNSCache 来解决这个问题,集群 DNS 的解析性能也明显大幅提升了。但是今天确遇到一个很大的坑,我们在做 DevOps 实验的时候,相关的工具都使用的是自定义的域名,这个时候要互相访问的话就需要添加自定义的域名解析,我们可以通过给 Pod 添加 hostAlias 来解决,但是在使用 Jenkins 的 Kubernetes 插件的时候却不支持这个参数,需要使用 YAML 来自定义,比较麻烦,所以想着通过 CoreDNS 来添加 A 记录解决这个问题。
正常我们只需要在 CoreDNS 的 ConfigMap 中添加 hosts 插件就可以使用了:
hosts {
  10.151.30.11 git.k8s.local
  fallthrough
}
但是在配置完成后,始终解析不了这个自定义的域名:
$ kubectl run -it --image busybox:1.28.4 test --restart=Never --rm /bin/sh
If you don't see a command prompt, try pressing enter.
/ # nslookup git.k8s.local
Server:    169.254.20.10
Address 1: 169.254.20.10

nslookup: can't resolve 'git.k8s.local'
这有点奇怪,难道 hosts 插件不能这样使用吗?在经过一番查阅过后确信这样配置是正确的方式。然后将 CoreDNS 的日志开启,来过滤上面域名的解析日志:

可以看到走了一遍 search 域,但是没有获取到正确的解析结果,这就有点不解了。在折腾了一番过后,想到我们在集群中启用了 NodeLocal DNSCache,难道是这个组件导致的吗?这个不是解析没有命中的时候会转发到 CoreDNS 查询吗?
为了验证这个问题,我们就直接使用 CoreDNS 的地址来进行解析测试一番:
/ # nslookup git.k8s.local 10.96.0.10
Server:    10.96.0.10
Address 1: 10.96.0.10 kube-dns.kube-system.svc.cluster.local

Name:      git.k8s.local
Address 1: 10.151.30.11 git.k8s.local
发现居然是正确的,那也就说明 CoreDNS 的配置是没有任何问题的,问题肯定就是 NodeLocal DNSCache 导致的,直接用 LocalDNS 的地址(169.254.20.10)解析发现确实是失败的:
/ # nslookup git.k8s.local 169.254.20.10
Server:    169.254.20.10
Address 1: 169.254.20.10

nslookup: can't resolve 'git.k8s.local'
这个时候只能去查看 LocalDNS 的 Pod 日志了:
$ kubectl logs -f node-local-dns-bb84m -n kube-system
......
2020/05/14 05:30:21 [INFO] Updated Corefile with 0 custom stubdomains and upstream servers /etc/resolv.conf
2020/05/14 05:30:21 [INFO] Using config file:
cluster.local:53 {
    errors
    cache {
            success 9984 30
            denial 9984 5
    }
    reload
    loop
    bind 169.254.20.10 10.96.0.10
    forward . 10.96.207.156 {
            force_tcp
    }
    prometheus :9253
    health 169.254.20.10:8080
    }
in-addr.arpa:53 {
    errors
    cache 30
    reload
    loop
    bind 169.254.20.10 10.96.0.10
    forward . 10.96.207.156 {
            force_tcp
    }
    prometheus :9253
    }
ip6.arpa:53 {
    errors
    cache 30
    reload
    loop
    bind 169.254.20.10 10.96.0.10
    forward . 10.96.207.156 {
            force_tcp
    }
    prometheus :9253
    }
.:53 {
    errors
    cache 30
    reload
    loop
    bind 169.254.20.10 10.96.0.10
    forward . /etc/resolv.conf {
            force_tcp
    }
    prometheus :9253
    }
......
[INFO] plugin/reload: Running configuration MD5 = 3e3833f9361872f1d34bc97155f952ca
CoreDNS-1.6.7
linux/amd64, go1.11.13,
仔细分析上面的 LocalDNS 的配置信息,其中 10.96.0.10 为 CoreDNS 的 Service ClusterIP,169.254.20.10 为 LocalDNS 的 IP 地址,10.96.207.156 是 LocalDNS 新建的一个 Service ClusterIP,该 Service 和 CoreDNS 一样都是关联以前的 CoreDNS 的 Endpoints 列表。
仔细观察可以发现 cluster.local、in-addr.arpa 以及 ip6.arpa 都会通过 forward 转发到 10.96.207.156,也就是去 CoreDNS 解析,其他的则是 forward . /etc/resolv.conf 通过 resolv.conf 文件去解析,该文件的内容如下所示:
nameserver 169.254.20.10
search default.svc.cluster.local svc.cluster.local cluster.local
options ndots:5
所以当我们解析域名 git.k8s.local 的时候需要走一遍搜索域,而 cluster.local 的域名是直接 forward 到 CoreDNS 解析的,CoreDNS 自然解析不出来这几天记录了。那么我们是不是自然可以想到把 hosts 插件配置在 LocalDNS 这边不就可以了吗?这种思路应该是完全正确的:
$ kubectl edit cm node-local-dns -n kube-system
......
.:53 {
    errors
    hosts {  # 添加 A 记录
      10.151.30.11 git.k8s.local
      fallthrough
    }
    cache 30
    reload
    loop
    bind 169.254.20.10 10.96.0.10
    forward . __PILLAR__UPSTREAM__SERVERS__ {
            force_tcp
    }
    prometheus :9253
}
......
更新完成后,我们可以手动重建 NodeLocalDNS Pod,重建过后确发现 NodeLocalDNS 的 Pod 启动失败了,会出现如下所示的错误信息:
no action found for directive 'hosts' with server type 'dns'原来压根就不支持 hosts 这个插件。那么我们就只有去 CoreDNS 解析了,所以这个时候我们需要把 forward . /etc/resolv.conf 更改成 forward . 10.96.207.156,这样就会去 CoreDNS 解析了,在 NodeLocalDNS 的 ConfigMap 中做如下的修改即可:
$ kubectl edit cm node-local-dns -n kube-system
......
.:53 {
    errors
    cache 30
    reload
    loop
    bind 169.254.20.10 10.96.0.10
    forward . __PILLAR__CLUSTER__DNS__ {
            force_tcp
    }
    prometheus :9253
}
......
同样修改完成后,需要重建 NodeLocalDNS 的 Pod 才会生效。
__PILLAR__CLUSTER__DNS__和__PILLAR__UPSTREAM__SERVERS__这两个参数在镜像 1.15.6 版本以上中会自动进行配置,对应的值来源于 kube-dns 的 ConfigMap 和定制的 Upstream Server 地址。
现在我们再去测试就可以正常解析自定义的域名了:
/ # nslookup git.k8s.local
Server:    169.254.20.10
Address 1: 169.254.20.10

Name:      git.k8s.local
Address 1: 10.151.30.11 git.k8s.local
对于使用 NodeLocalDNS 的用户一定要注意这个问题,如果使用 hosts 或者 rewrite 插件失效,基本上就是这个问题造成的。排查问题通过日志去分析始终是最好的手段。