Simplifying Microservices with Istio in Google Kubernetes Engine – Part I
https://cdn.embedly.com/widgets/media.html?src=https%3A%2F%2Fplay.ht%2Fembed%2F%3Farticle_url%3Dhttps%3A%2F%2Fmedium.com%2F_p%2Fsimplifying-microservices-with-istio-in-google-kubernetes-engine-part-i-849555f922b8&url=https%3A%2F%2Fplay.ht%2Farticles%2F849555f922b8&image=https%3A%2F%2F1%2A3wfZn5VDodY8hufQ8rCS3Q.png&key=a19fcc184b9711e1b4764040d3dc5c07&type=text%2Fhtml&schema=playIstio simplifies service to service communication, traffic ramping, fault tolerance, performance monitoring, tracing and much, much more. How can we leverage it to abstract out the infrastructure and crosscutting functions from our microservices?
What I write about Istio is a subset of the awesome documentation that is on the Istio site. Please read the official docs to understand more.
Note: you can skip the Background section if you are familiar with microservices.
In Part I of this series, we’ll cover the following areas:
- Background: monolithic apps and introduction to Microservices
- The Spring Cloud Netflix Stack and its advantages
- Introducing Istio
- Service-service communication example with Istio
Background:
In the past, we had big, monolithic apps that “did it all”. This was a way to get our product to market and worked well initially as we just had to get our first application online, and we could always come back to improve it. It was easier to deploy one big app than to build and deploy multiple smaller pieces.
However, such application development led to ‘Big Bang’ efforts (where we would deploy the whole application at once after months of work) and incremental changes were staggered out over long periods of time due to the complex nature of the build/test/deploy/release cycles. It wasn’t exactly much bang for the buck though, if you were a Product Owner, especially if a serious bug was found after deploying a new version of our application. This could even lead to a rollback of the application. Deploying such large applications to the Cloud and scaling them wasn’t easy either as the entire app would need to be scaled vs smaller components.
Enter Microservices:
Microservices are suites of independently deployable services running within their own processes. They often communicate using HTTP resources and each service is typically responsible for a single area within the application. In the popular e-Commerce catalog example, you can have an ItemsService, a ReviewService and a RatingsService each focusing on one area.
This approach helped distributed teams contribute to various services without having to build/test/deploy the whole application for every service change and also not have to step all over each other’s code. Deploying services to the Cloud is also easier as individual services could be auto-scaled based on need.
Polyglot services (services written in different languages) were also made possible with this approach as we could have a Java/C++ service do more processing-intensive work and a Rails/Node.js service could be used to support front end applications and so on.
Spring Cloud Netflix:
With the popularity of Microservices, there was a proliferation of frameworks that simplified service creation and management. My personal favorite in 2015 was the Netflix OSS stack (Spring Cloud Netflix) that introduced me to a simple way of creating Microservices in Java from within my Spring Tool Suite IDE.
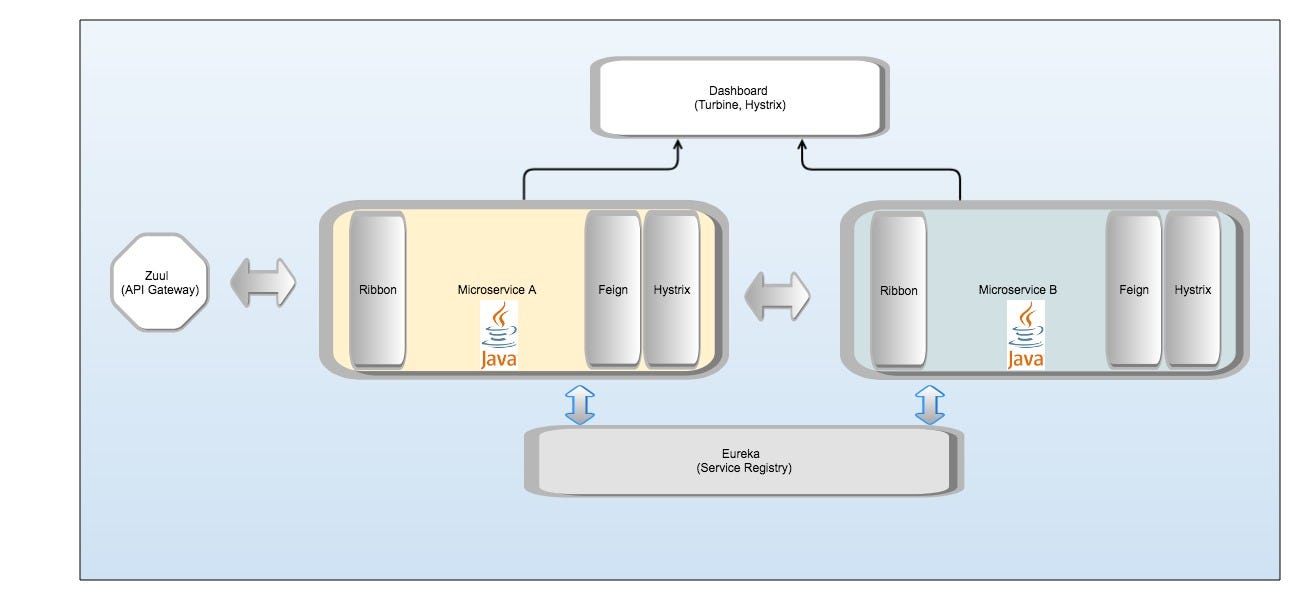
I could get the following features with the Netflix suite (Figure 1 below):
- Service Registry with Eureka — for registration and discovery of services
- Client side load balancing with Ribbon — clients can choose what server to send their requests to.
- Declarative REST client Feign to talk to other services. Internally, it uses Ribbon.
- API Gateway with Zuul — single entry point to manage all API calls, routing rules etc. to our microservices
- Circuit Breakers with Hystrix — handling fault tolerance along with the ability to turn off a communication channel for a short period of time (breaking the circuit) and return a user friendly response if the destination service is down
- Dashboards with Hystrix and Turbine — visualizing traffic and circuit breakers
However, this method of building and deploying applications comes with its own challenges.
Challenges:
Deployment: How do we deploy our services to the Cloud in a consistent manner and ensure that they are always available and have them auto-scale to our needs?
Cross-cutting concerns: How do we get all the features that we had seen in the Spring Cloud Netflix implementation above plus morewith little to no code changes to each microservice? Also,how do we handle services written in different languages?
Solutions:
Deployment: Kubernetes has paved the way to efficiently deploy and orchestrate Docker containers in Google Kubernetes Engine (GKE). Kubernetes abstracts infrastructure and allows us to interact with it through APIs. Please see the links at the end of this article for more details.
Cross-cutting concerns: We can use Istio. The official explanation on the Istio website says “Istio provides an easy way to create a network of deployed services with load balancing, service-to-service authentication, monitoring, and more, without requiring any changes in service code. You add Istio support to services by deploying a special sidecar proxy throughout your environment that intercepts all network communication between microservices, configured and managed using Istio’s control plane functionality.”
Introducing Istio:
In other words, with Istio, we can create our microservices and deploy them along with a “lightweight sidecar proxy” (Figure 2 below) that will handle many of our cross cutting needs such as:
- Service-Service communication
- Tracing
- Circuit Breaking (Hystrix-like functionality) and retries
- Performance monitoring and dashboards (similar to the Hystrix and Turbine dashboards)
- Traffic routing (example: send x% traffic to v2 of our app), canary deployments
- An added bonus (especially if you are working with sensitive data such as PHI in Healthcare) — egress (calls made to external services outside the Istio Service mesh) need to be explicitly configured and can prevent services from making ad-hoc calls outside of the service mesh.
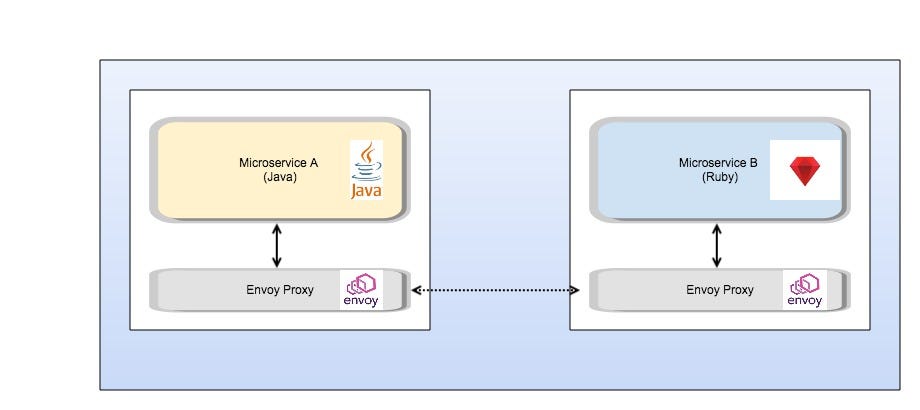
In Figure 2 above, we have eliminated many of the components that were present in Figure 1 and added a new component (Envoy Proxy). Each service (A) that needs to talk to another service (B) communicates with its proxy which is pre-configured with rules to route to other destination proxies. Proxies talk to proxies. Since ALL the communication happens through the proxies, it is easy to monitor the traffic, gather metrics, apply circuit breaker rules etc. as needed.
Declaratively configuring rules and policies for cross cutting features, without having to make code changes to our services allows us to focus on what matters most: building high quality services that deliver business value.
At a high level, Istio has the following components:
- Envoy: a high performance, low footprint proxy that enables communication between the services and helps with load balancing, service discovery and more.
- Mixer: is responsible for the access control policies across all the services in the ecosystem (the Service Mesh) and gathers telemetry information sent by Envoy and other services
- Pilot: helps with service discovery, traffic ramping and fault tolerance (circuit breaking, retries etc.)
- Istio-Auth: is used for service-service authentication as well as end user authentication using mutual TLS. The example in this article does not use Istio-Auth
Service-service communication with Istio:
Let’s see it in practice!
We’ll take a simple example where we show 3 microservices communicating via the Envoy proxy. They have been created in Node.js but, as mentioned before, they could be in any language. Github
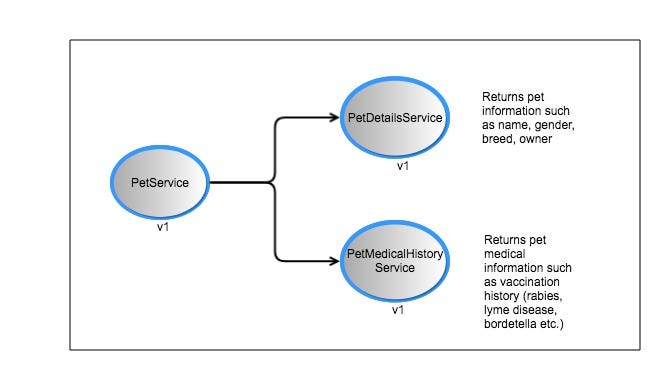
- PetService: returns a pet’s information and medical history by calling the PetDetailsService and the PetMedicalHistoryService. It will be running on port 9080.
- PetDetailsService: returns pet information such as name, age, breed, owner etc. It will be running on port 9081.
- PetMedicalHistoryService: returns a pet’s medical history (vaccinations). It will be running on port 9082.
Steps:
Create a Kubernetes cluster in GKE (nithinistiocluster in my case). Ensure that the default service account has the following permission:
roles/container.admin (Kubernetes Engine Admin)
Install istio as described in https://istio.io/docs/setup/kubernetes/quick-start.html
- Now, we are ready to deploy our application (the 3 services above) to GKE and inject the sidecar proxy into the deployments
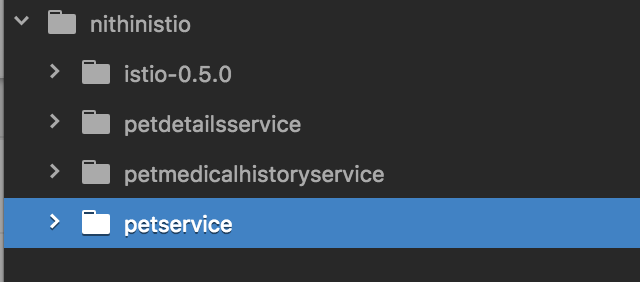
- In the github repo, you will see 4 folders (the istio folder that was created when I installed the various components and the 3 folders for my microservices)
5. For each microservice, I have a corresponding Kubernetes Deployment and Service created in the kube folder in the petinfo.yaml file. The Services are called petservice, petdetailsservice and petmedicalhistoryservice. Since the PetService is accessible publicly, it has a Kubernetes Ingress that points to the petservice Service.
6. You can go to each service folder, update your project and cluster names in the deploy.sh file and run it. It builds the service, creates a Docker image, uploads it to the Google Container Registry and then runs istioctl to inject the Envoy proxy. For example, for the PetService, it would look like:
#!/usr/bin/env bashexport PROJECT=nithinistioproject
export CONTAINER_VERSION=feb4v2
export IMAGE=gcr.io/$PROJECT/petservice:$CONTAINER_VERSION
export BUILD_HOME=.gcloud config set project $PROJECT
gcloud container clusters get-credentials nithinistiocluster --zone us-central1-a --project $PROJECTecho $IMAGE
docker build -t petservice -f "${PWD}/Dockerfile" $BUILD_HOME
echo 'Successfully built ' $IMAGEdocker tag petservice $IMAGE
echo 'Successfully tagged ' $IMAGE#push to google container registry
gcloud docker -- push $IMAGE
echo 'Successfully pushed to Google Container Registry ' $IMAGE# inject envoy proxy
kubectl apply -f <(istioctl kube-inject -f "${PWD}/kube/petinfo.yaml")
In the above code, the highlighted line shows how we can use the Istio command line tool (istioctl) to inject the proxy into our various Kubernetes deployments.
The petinfo.yaml file under the petservice folder contains configuration for a Service, a Deployment and an Ingress. It looks like:
apiVersion: v1
kind: Service
metadata:
  name: petservice
  labels:
    app: petservice
spec:
  ports:
  - port: 9080
    name: http
  selector:
    app: petservice
---
apiVersion: extensions/v1beta1
kind: Deployment
metadata:
  name: petservice-v1
spec:
  replicas: 1
  template:
    metadata:
      labels:
        app: petservice
        version: v1
    spec:
      containers:
      - name: petservice
        image: gcr.io/nithinistioproject/petservice:feb4v2
        imagePullPolicy: IfNotPresent
        ports:
        - containerPort: 9080
---###########################################################################
# Ingress resource (gateway)
##########################################################################
apiVersion: extensions/v1beta1
kind: Ingress
metadata:
  name: gateway
  annotations:
    kubernetes.io/ingress.class: "istio"
spec:
  rules:
  - http:
      paths:
      - path: /pet/.*
        backend:
          serviceName: petservice
          servicePort: 9080
---
Once you run deploy.sh for each of the 3 services, you can check whether the Deployment, Service and Ingress have been created by executing:
mallyn01$ kubectl get deploymentNAME                          DESIRED   CURRENT   UP-TO-DATE   AVAILABLE   AGEpetdetailsservice-v1          1         1         1            1           1hpetmedicalhistoryservice-v1   1         1         1            1           58mpetservice-v1                 1         1         1            1           54mmallyn01$ kubectl get serviceNAME                       TYPE        CLUSTER-IP     EXTERNAL-IP   PORT(S)    AGEkubernetes                 ClusterIP   10.51.240.1    <none>        443/TCP    2dpetdetailsservice          ClusterIP   10.51.255.10   <none>        9081/TCP   1hpetmedicalhistoryservice   ClusterIP   10.51.244.19   <none>        9082/TCP   59mpetservice                 ClusterIP   10.51.242.18   <none>        9080/TCP   1h
petservice mallyn01$ kubectl get ingNAME      HOSTS     ADDRESS        PORTS     AGEgateway   *         108.59.82.93   80        1hmallyn01$ kubectl get podsNAME                                           READY     STATUS    RESTARTS   AGEpetdetailsservice-v1-5bb8c65577-jmn6r          2/2       Running   0          12hpetmedicalhistoryservice-v1-5757f98898-tq5j8   2/2       Running   0          12hpetservice-v1-587696b469-qttqk                 2/2       Running   0          12h
When you look at the pods in the above console output, you will notice that 2/2 containers are running even though you deployed only 1 service per container. The other container is the sidecar proxy that has been injected by the istioctl command.
7. Once all the above are running, you can use the Ingress’s IP Address and invoke a sample endpoint to fetch a Pet’s details.
mallyn01$ curl http://108.59.82.93/pet/123{
  "petDetails": {
    "petName": "Maximus",
    "petAge": 5,
    "petOwner": "Nithin Mallya",
    "petBreed": "Dog"
  },
  "petMedicalHistory": {
    "vaccinationList": [
      "Bordetella, Leptospirosis, Rabies, Lyme Disease"
    ]
  }
}
Note: Since the PetService invokes the PetDetailsService and the PetMedicalHistoryService, the actual invocation would look like:
fetch('http://petdetailsservice:9081/pet/123/details')
          .then(res => res.text())
          .then(body => console.log(body));
        ;fetch('http://petmedicalhistoryservice:9082/pet/123/medicalhistory')
          .then(res => res.text())
          .then(body => console.log(body));
        ;
Conclusion: We covered a LOT of material (and this is just Part I !!)
In subsequent parts, I’ll include details on how to use other Istio features such as ramping traffic to newer versions of the app, using the Performance monitoring dashboards etc.
Special thanks to Ray Tsang for his presentation on Istio
Resources:
- The Istio home page https://istio.io/
- DevOxx Istio presentation by Ray Tsang: https://www.youtube.com/watch?v=AGztKw580yQ&t=231s
- Github link to this example: https://github.com/nmallya/istiodemo
- All things Kubernetes: https://kubernetes.io/
- Microservices: https://martinfowler.com/articles/microservices.html
- Spring Cloud Netflix: https://github.com/spring-cloud/spring-cloud-netflix
Simplifying Microservices with Istio in Google Kubernetes Engine — Part II
Nithin MallyaFollowFeb 11, 2018 · 3 min readhttps://cdn.embedly.com/widgets/media.html?src=https%3A%2F%2Fplay.ht%2Fembed%2F%3Farticle_url%3Dhttps%3A%2F%2Fmedium.com%2F_p%2Fsimplifying-microservices-with-istio-in-google-kubernetes-engine-part-ii-7461b1833089&url=https%3A%2F%2Fplay.ht%2Farticles%2F7461b1833089&image=https%3A%2F%2F1%2A3wfZn5VDodY8hufQ8rCS3Q.png&key=a19fcc184b9711e1b4764040d3dc5c07&type=text%2Fhtml&schema=play
What I write about Istio is a subset of the awesome documentation that is on the Istio site. Please read the official docs to understand more.
In Part I of this series, we saw how we could use Istio to simplify communication between our microservices.
In this part, we’ll see how services within the Istio Service Mesh communicate with external services over HTTPS
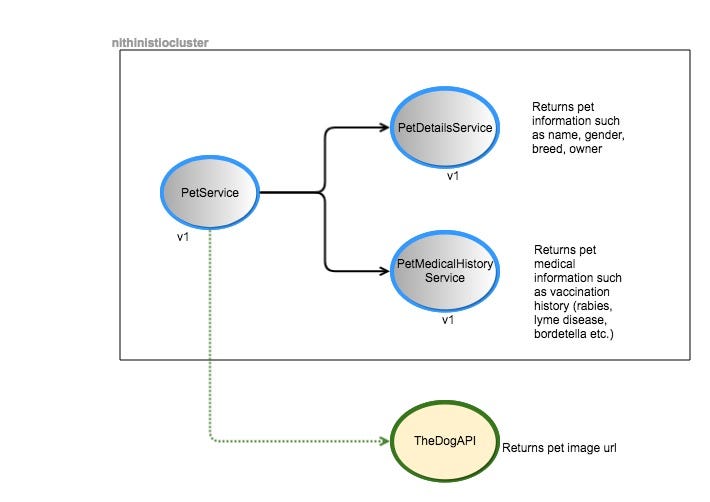
In Figure 1 above, our PetService (that talks to the PetDetailsService and the PetMedicalHistoryService) will now also invoke an external service located at https://thedogapi.co.uk/ that returns dog image urls.
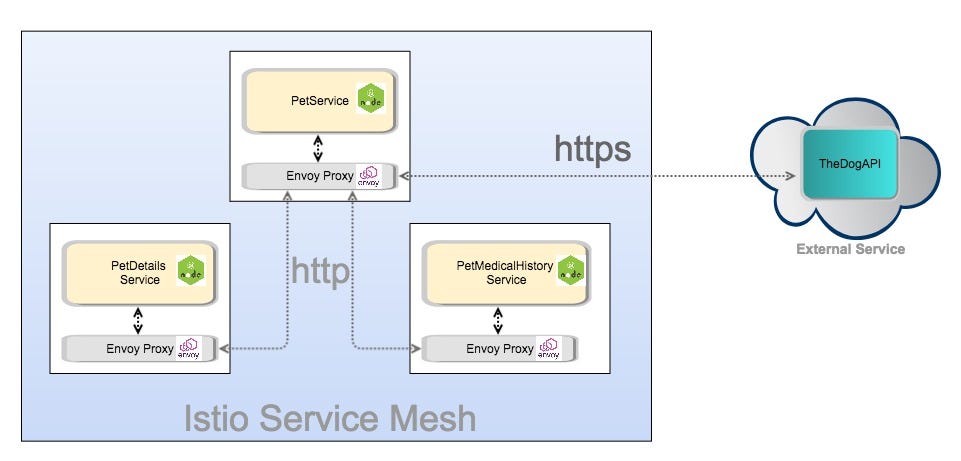
The external service communication from within the Istio Service Mesh is shown in Figure 2 below.
- As always, all communication between the services within the service mesh is through the proxies over HTTP
- To communicate with external services over HTTPS, the internal service will still send HTTP requests which are intercepted by the sidecar proxy that does TLS origination and communicates with the external service over an encrypted channel.
The petservice code to do this looks like:
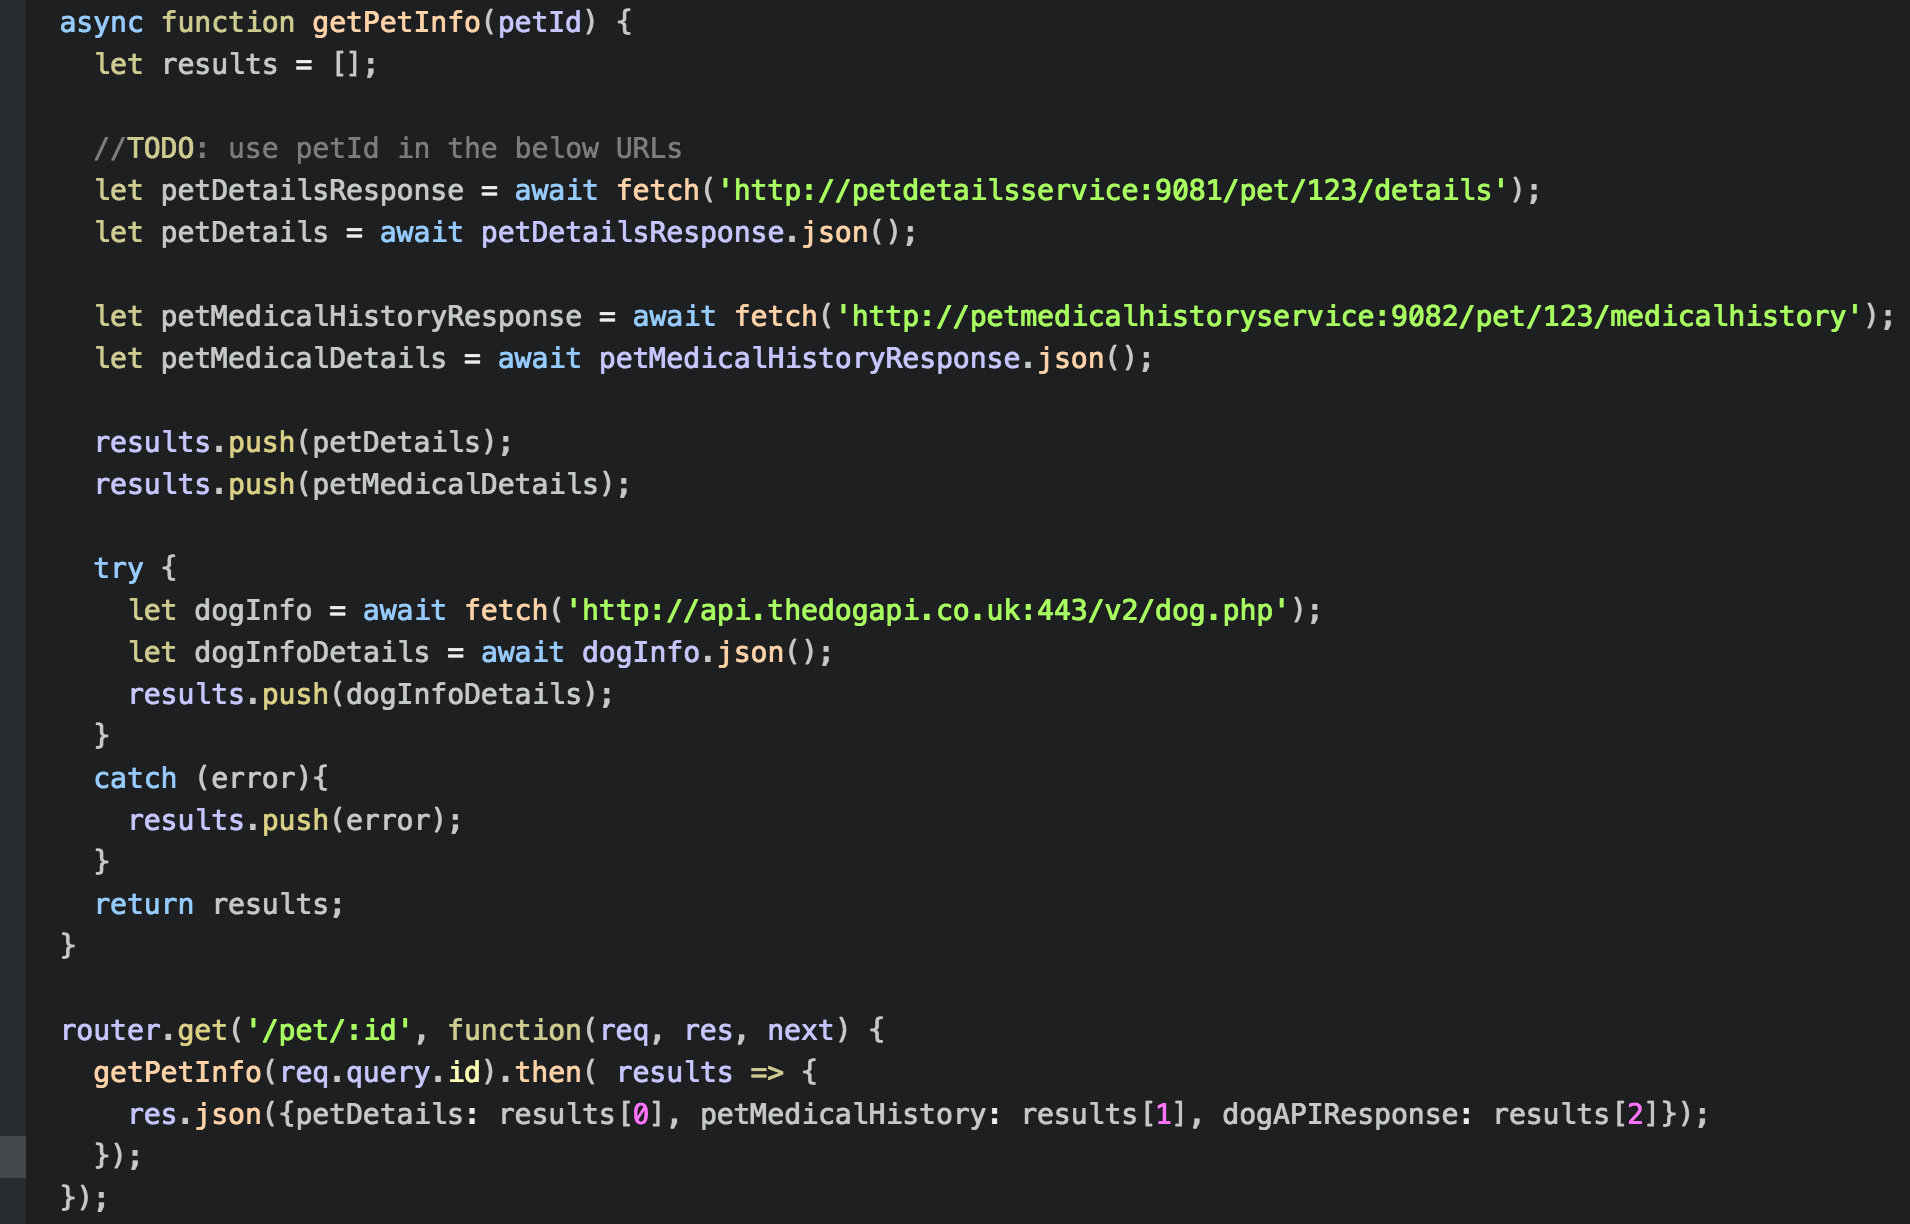
Note: see how we invoke the https url for the DogAPI as http://api.thedogapi.co.uk:443/v2/dog.php
Let’s see what happens when we run the following command where 108.59.82.93 is the Ingress IP address.(see Part I)
curl http://108.59.82.93/pet/123
The response looks like:
{
  "petDetails": {
    "petName": "Maximus",
    "petAge": 5,
    "petOwner": "Nithin Mallya",
    "petBreed": "Dog"
  },
  "petMedicalHistory": {
    "vaccinationList": [
      "Bordetella, Leptospirosis, Rabies, Lyme Disease"
    ]
  },
  "dogAPIResponse": {
    "message": "request to https://api.thedogapi.co.uk/v2/dog.php failed, reason: read ECONNRESET",
    "type": "system",
    "errno": "ECONNRESET",
    "code": "ECONNRESET"
  }
}
You will notice in the above response that the dogAPIResponse (not the most original name) section has an error when our petservice tries to access the external service located at https://api.thedogapi.co.uk
This is because all the external traffic (egress) is blocked by default. The sidecar proxy explained in the previous article, allows communication only within the cluster.
Note: As I had mentioned in Part I, this restriction is quite helpful, when we want to govern the way our services talk to external services and prevent any unauthorized communication with outside systems.
Healthcare/Financial systems can especially leverage this feature to protect PHI/PII data from being shared inadvertently or even maliciously from internal services.
To enable egress traffic, you would need to create an egress rule as follows:
cat <<EOF | istioctl create -f -
apiVersion: config.istio.io/v1alpha2
kind: EgressRule
metadata:
  name: dogapi-egress-rule
spec:
  destination:
    service: api.thedogapi.co.uk
  ports:
    - port: 443
      protocol: https
EOF
To check if this egress rule has been created, you can run the following command and you should see the egress rule dogapi-egress-rule has been created.
kubectl get egressruleNAME AGEdogapi-egress-rule 5m
Let’s try the above curl command again:
$ curl http://108.59.82.93/pet/123{
  "petDetails": {
    "petName": "Maximus",
    "petAge": 5,
    "petOwner": "Nithin Mallya",
    "petBreed": "Dog"
  },
  "petMedicalHistory": {
    "vaccinationList": [
      "Bordetella, Leptospirosis, Rabies, Lyme Disease"
    ]
  },
  "dogAPIResponse": {
    "count": 1,
    "api_version": "v2",
    "error": null,
    "data": [
      {
        "id": "rCaz-LNuzCC",
        "url": "https://i.thedogapi.co.uk/rCaz-LNuzCC.jpg",
        "time": "2017-08-30T21:43:03.0",
        "format": "jpg",
        "verified": "1",
        "checked": "1"
      }
    ],
    "response_code": 200
  }
}
And it works! You can see a sample url for a pet image returned in the DogAPI response.
Conclusion: We saw how we can enable communication from the service mesh to external services by creating explicit rules.
In subsequent articles, we will see how to do other important tasks such as traffic routing and ramping, using circuit breakers etc.
Resources:
- Part I of this article series: https://medium.com/google-cloud/simplifying-microservices-with-istio-in-google-kubernetes-engine-part-i-849555f922b8
- The Istio home page https://istio.io/
- DevOxx Istio presentation by Ray Tsang: https://www.youtube.com/watch?v=AGztKw580yQ&t=231s
- Github link to this example: https://github.com/nmallya/istiodemo
- All things Kubernetes: https://kubernetes.io/
- The DogAPI page: https://thedogapi.co.uk/
Simplifying Microservices with Istio in Google Kubernetes Engine — Part III
Nithin MallyaFollowFeb 16, 2018 · 5 min readhttps://cdn.embedly.com/widgets/media.html?src=https%3A%2F%2Fplay.ht%2Fembed%2F%3Farticle_url%3Dhttps%3A%2F%2Fmedium.com%2F_p%2Fsimplifying-microservices-with-istio-in-google-kubernetes-engine-part-iii-6b62876d0a7d&url=https%3A%2F%2Fplay.ht%2Farticles%2F6b62876d0a7d&image=https%3A%2F%2F1%2A3wfZn5VDodY8hufQ8rCS3Q.png&key=a19fcc184b9711e1b4764040d3dc5c07&type=text%2Fhtml&schema=play
What I write about Istio is a subset of the awesome documentation that is on the Istio site. Please read the official docs to understand more.
In Part I of this series, we saw how we could use Istio to simplify communication between our microservices.
In Part II of this series, we learned to use Istio egress rules to control access to services outside the Service Mesh.
In this part, we’ll see how we can do Canary Deployments and ramp traffic with Istio
Background: In past articles, I explained in detail how we could do Blue/Green deployments with Kubernetes. It is a deployment technique where we deploy identical production environments with the current version of our application and a new version. This technique enables us to do Zero Downtime Deployments (ZDD) to ensure that our users are not impacted when we switch to a new version. Having two versions (the current version and the new one) also gives us the ability to rollback if the new version has any issues.
What we also need is the ability to ramp traffic up (or down) to new versions of our app and monitor it to ensure that there is no adverse impact. One way to achieve this is with Canary deployments or Canary Releases.
Not-so-fun fact: Miners took canaries with them when entering mines. Any toxic gasses would kill the canaries first and act as a warning to the miners to get out of the mines.
Likewise, in the application deployment world, with Canary deployments, we can deploy a new version of our application to Production and send only a small percentage of the traffic to this new deployment. This new version would run in parallel with the current version and alert us to any issues before we switch all traffic to the new version.
For example: v1 of our app could front 90% of traffic and v2 could get the other 10%. If everything looks good, we can ramp the v2 traffic up to 25%, 50% and ultimately 100%. Another advantage of Istio Canary deployments is that we can ramp traffic based on custom headers in the requests. For example, ramp 10% of the traffic with a certain cookie header value to v2 of our app.
Note: While Canary deployments “can” be used in conjunction with A/B testing to see how users react to a new version from a business metric perspective, the real motivation behind it is to ensure that the application performs satisfactorily from a functional standpoint. Also, business owners might want to run a A/B testing campaign for a longer time (example: many days or even weeks) than what the Canary ramp might take. Hence, it would be wise to keep them separate.
Let’s see it in action!
We know from Part I that our PetService talks to the PetDetailsService(v1) and PetMedicalHistoryService(v1). The output from the call to the PetService looks like:
$ curl http://108.59.82.93/pet/123{
  "petDetails": {
    "petName": "Maximus",
    "petAge": 5,
    "petOwner": "Nithin Mallya",
    "petBreed": "Dog"
  },
  "petMedicalHistory": {
    "vaccinationList": [
      "Bordetella, Leptospirosis, Rabies, Lyme Disease"
    ]
  }
}
In the response above, you will notice that the petBreed says “Dog”. However, Maximus happens to be a German Shepherd Dog and we need to modify the PetDetailsService so that the breed is returned correctly.
So, we create v2 of the PetDetailsService which would return “German Shepherd Dog” now. But, we want to ensure that we can test v2 of this service with a small subset of users before driving all the traffic to v2.
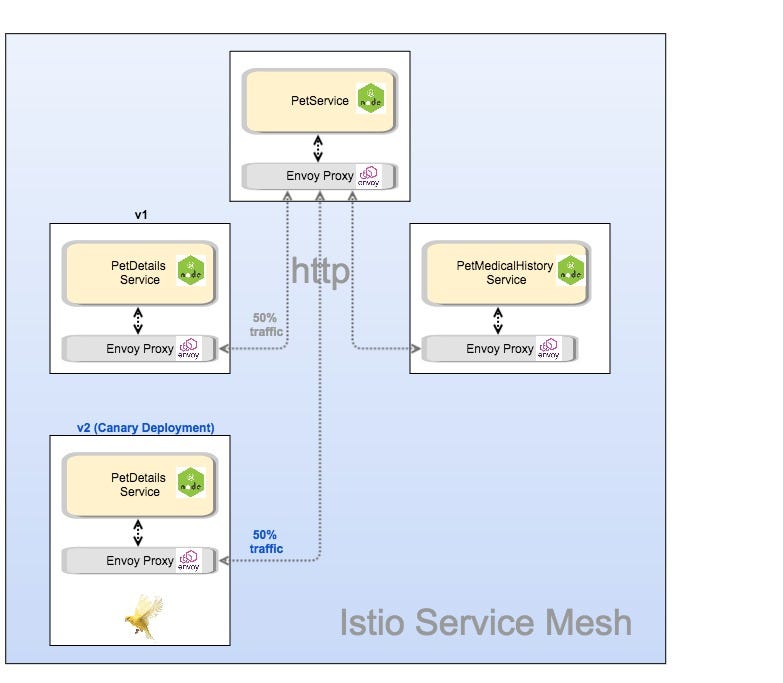
In Figure 1 below, we see that the traffic is configured such that 50% of the requests will be directed to v1 and 50% to v2, our Canary deployment. (It could be any number depending on how major the changes are and to minimize any negative impact).
Steps:
- Create version v2 of our PetDetailsService and deploy it as before. (see petinfo.yaml under the petdetailservice/kube folder)
$ kubectl get podsNAME READY STATUS RESTARTS AGEpetdetailsservice-v1-2831216563-qnl10 2/2 Running 0 19hpetdetailsservice-v2-2943472296-nhdxt 2/2 Running 0 2hpetmedicalhistoryservice-v1-28468096-hd7ld 2/2 Running 0 19hpetservice-v1-1652684438-3l112 2/2 Running 0 19h
2. Create a RouteRule that splits traffic into 50%(v1) and 50%(v2) of the petdetailsservice as shown below:
cat <<EOF | istioctl create -f -
apiVersion: config.istio.io/v1alpha2
kind: RouteRule
metadata:
  name: petdetailsservice-default
spec:
  destination:
    name: petdetailsservice
  route:
  - labels:
      version: v1
    weight: 50
  - labels:
      version: v2
    weight: 50
EOF$ istioctl get routeruleNAME    KIND     NAMESPACEpetdetailsservice-default RouteRule.v1alpha2.config.istio.io default
3. Now, if you access the PetService, you should see alternate requests returning “Dog” and “German Shepherd Dog” respectively, as below:
$ curl http://108.59.82.93/pet/123{
  "petDetails": {
    "petName": "Maximus",
    "petAge": 5,
    "petOwner": "Nithin Mallya",
    "petBreed": "Dog"
  },
  "petMedicalHistory": {
    "vaccinationList": [
      "Bordetella, Leptospirosis, Rabies, Lyme Disease"
    ]
  }
}$ curl http://108.59.82.93/pet/123{
  "petDetails": {
    "petName": "Maximus",
    "petAge": 5,
    "petOwner": "Nithin Mallya",
    "petBreed": "German Shepherd Dog"
  },
  "petMedicalHistory": {
    "vaccinationList": [
      "Bordetella, Leptospirosis, Rabies, Lyme Disease"
    ]
  }
}
And it works!
This begs the question: Couldn’t we do this with Kubernetes Canary Deployments? The short answer is yes.
However, the steps to do so are more involved and there are limitations:
- You would still create 2 Deployments of the PetDetailsService (v1 and v2) but you would need to manually restrict the number of v2 replicas during deployment, to maintain the v1:v2 ratio. For example: you could deploy v1 with 10 replicas and have v2 deployed with 2 replicas for a 10:2 load balancing, and so on.
- Since all pods, irrespective of versions are treated the same, the traffic load balancing in a Kubernetes cluster is still subject to randomness.
- Autoscaling pods based on traffic volume is also problematic because we would need to separately autoscale the 2 Deployments which can behave differently based on traffic load distribution on each of the services
- If we want to allow/restrict traffic for only some users based on some criteria such as request headers, Kubernetes Canary Deployments may not be able to achieve this.
Conclusion: You just saw how easy it is to create a canary deployment and ramp traffic with Istio. And, Maximus is happy too!

Resources:
- Part I of this article series: https://medium.com/google-cloud/simplifying-microservices-with-istio-in-google-kubernetes-engine-part-i-849555f922b8
- Part II of this article series: https://medium.com/google-cloud/simplifying-microservices-with-istio-in-google-kubernetes-engine-part-ii-7461b1833089
- The Istio home page https://istio.io/
- DevOxx Istio presentation by Ray Tsang: https://www.youtube.com/watch?v=AGztKw580yQ&t=231s
- Github link to this example: https://github.com/nmallya/istiodemo
- All things Kubernetes: https://kubernetes.io/